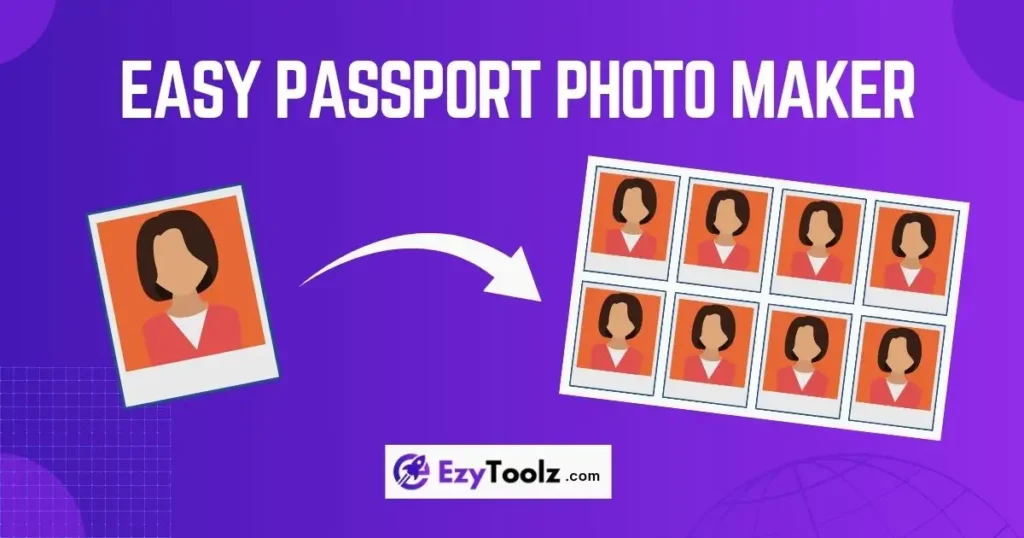
Create Passport Size Photos in 5 Mins for Free – No App Needed!
Getting official photos for documents like passports, visas, or IDs has traditionally been a frustrating and expensive chore. You either find a photo booth at the last minute, hoping you get a decent shot in one try, or you book an appointment at a professional studio, spending both time and a significant amount of money. What if you could skip the hassle entirely and create passport size photos online?
Welcome to the future of document photos. This guide will introduce you to a powerful free passport photo tool from EzyToolz.com that puts everyone—from individuals to small business owners—in complete control. We’ll walk you through everything you need to know, from taking the perfect picture with your phone to generating a print-ready sheet in seconds, with no technical skills or app installation required.
Table of Contents
Why Create Passport Size Photos Online with Our Tool?
In a world full of complex software and paid apps, our online Passport Photo Maker stands out by being simple, powerful, and completely free. It’s more than just a cropping tool; it’s a complete solution designed to make your life easier. Here’s why you should use it for your next ID photo needs.
- Massive Cost Savings: Professional photo studios and automated photo booths can charge a premium for a small set of pictures. Our tool is 100% free to use. Create as many photos as you need for yourself and your family without spending a single rupee.
- Unmatched Convenience and Speed: Why travel and wait in line? Our tool works directly in your web browser. The entire process, from uploading your photo to downloading the final print sheet, can be completed in under five minutes.
- Get the Perfect Shot Every Time: Photo booths give you one or two chances to get it right. When you make your own passport photo at home, you are in control. Take as many pictures as you want with your smartphone until you get one you’re happy with, ensuring you look great on your official documents.
- Guaranteed Compliance with Official Standards: Our tool removes the anxiety of rejection. It comes pre-loaded with the exact size and composition requirements for numerous countries, including the USA (2×2 inch), UK, India, and the Schengen visa. The on-screen cropping guide ensures your photo meets strict government regulations.
- Empower Your Business: This tool isn’t just for personal use. Photo studios, print shops, and entrepreneurs can use our platform to launch or streamline a passport photo service. Offer your customers instant, compliant photos with zero software investment, creating a new revenue stream with ease.
How to Use Our Tool (Step-by-Step Guide)
Our Passport Photo Maker is designed with a simple, guided 4-step process. Even if you’ve never edited a photo before, you’ll find it incredibly easy to use. Here’s a detailed walkthrough:
Step 1: Upload Your Photo
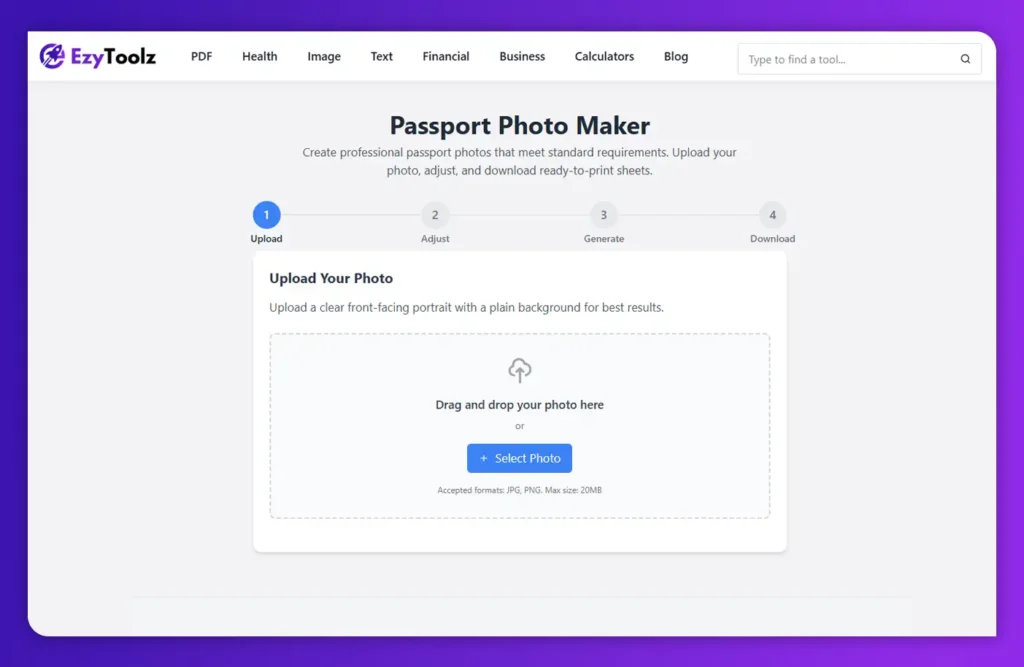
This is the first and most important step. The quality of your final passport photo depends heavily on the quality of the picture you start with.
- Find the Upload Area: On the tool’s main page, you’ll see a large, clearly marked area where you can either drag and drop your image file or click the “Select Photo” button to browse your computer or phone.
- Choose the Right Picture: Select a recent, clear, front-facing portrait. Make sure you are looking directly at the camera with a neutral expression.
- Preview and Check: Once uploaded, the tool will show you a preview of your photo. At this stage, you can also access a helpful link to an external service like
remove.bgif your photo has a cluttered background. For best results, using a photo with a plain, light-colored background is recommended. - Proceed: Once you are happy with your uploaded photo, click the “Continue to Adjust” button to move to the next step.
Step 2: Adjust and Customize Your Photo
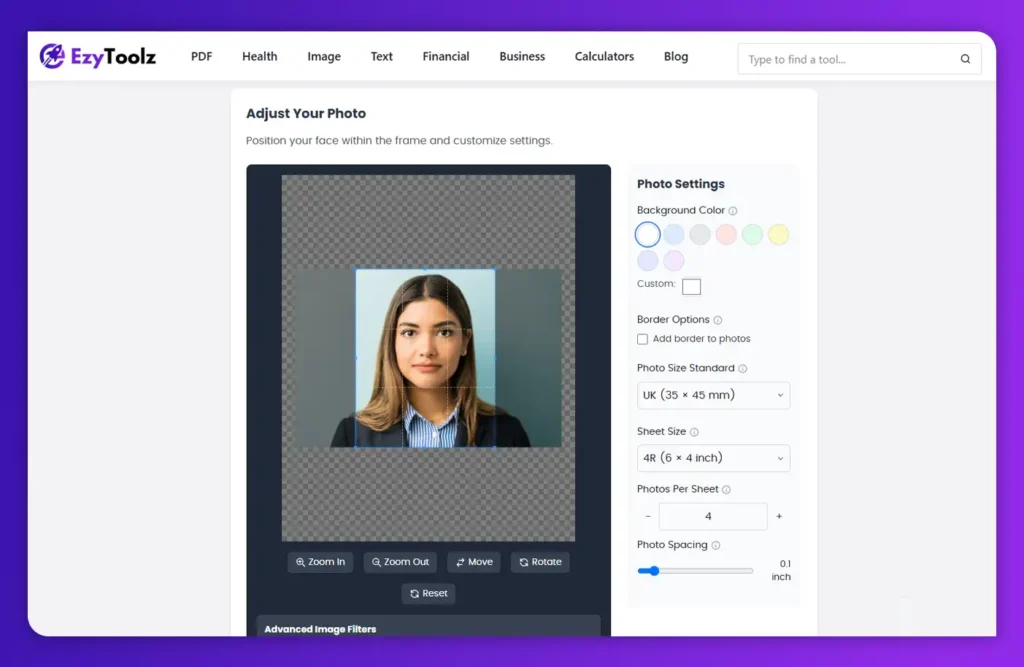
This is where the magic happens. You’ll crop the photo to official dimensions and make any necessary edits.
- Select Your Country’s Standard: The first thing you should do is select the correct photo size from the “Photo Size Standard” dropdown menu. You’ll find options for the USA, UK, India, and more. If you need a non-standard size, you can select “Custom Size.”
- Crop Your Image: An overlay will appear on your photo, showing you the exact cropping area. Use your mouse or fingers to move and zoom the image until your head and shoulders are perfectly positioned within the guidelines. The tool’s pre-set aspect ratio ensures the final crop will be the correct dimension.
- Change the Background Color: Most official photos require a white or light-colored background. In the settings panel, you can select from a palette of common colors or use the custom color picker to choose the exact shade you need.
- Apply Advanced Filters (Optional): If your photo is a little too dark or lacks contrast, you can use the “Advanced Image Filters.” Adjust the sliders for Brightness, Contrast, and Saturation to enhance your photo. There’s even a Sharpness filter to make details clearer.
- Add a Border (Optional): Some ID photos look more professional with a thin border. You can enable this option and choose the border’s width and color.
- Continue: Once you’ve made all your adjustments, click “Generate Photos” to proceed.
Step 3: Generate the Photo Sheet
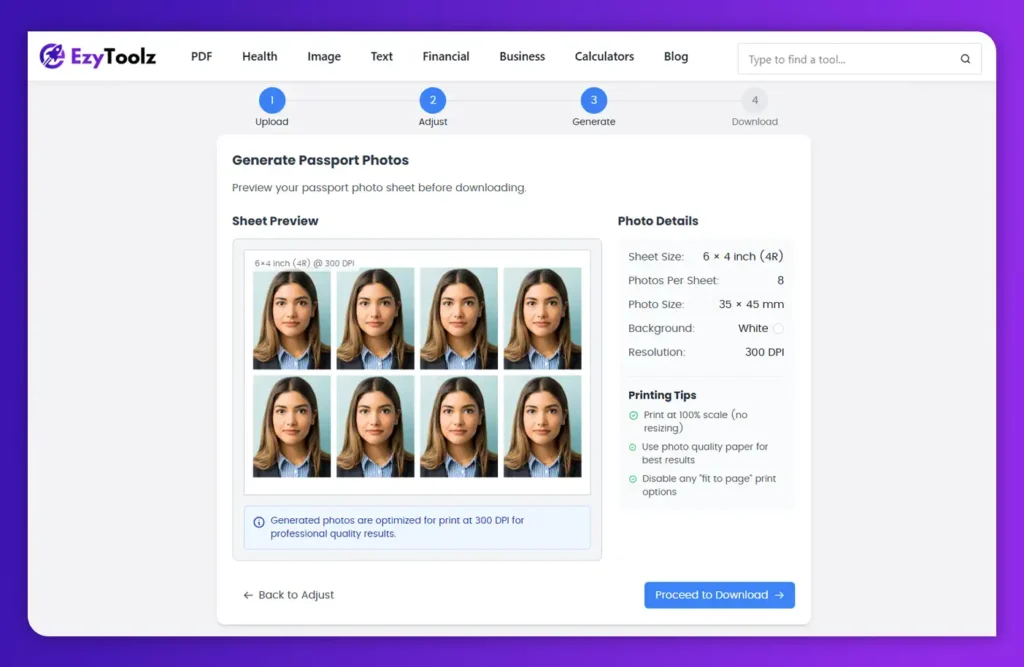
In this step, the tool prepares your cropped and edited photo for printing.
- Choose Your Sheet Size: Select a standard paper size for printing, such as 4R (6×4 inch), A4, or Letter. This will determine how many photos can fit on a single page.
- Set Photos Per Sheet: You can choose how many copies of your passport photo you want on the sheet. The tool will automatically arrange them for you.
- Preview the Sheet: The tool will generate a real-time preview of your final print sheet. You can see exactly how the photos will be laid out on the paper, ensuring there are no surprises. The preview also confirms the print resolution (300 DPI), which is essential for high-quality results.
- Proceed to Download: If everything looks perfect, click the “Proceed to Download” button.
Step 4: Download Your Photos
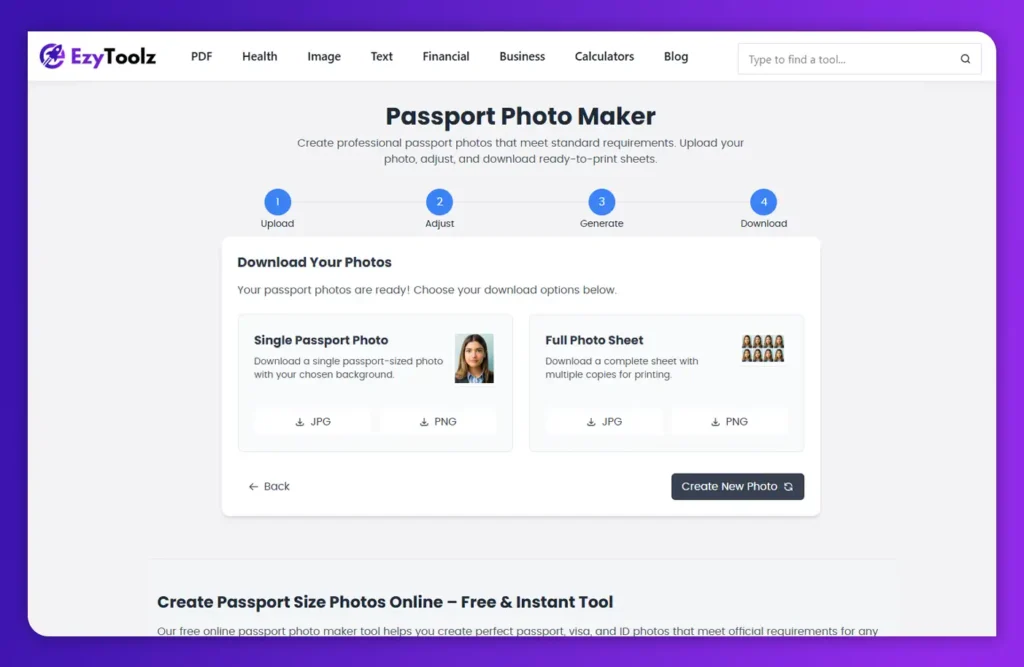
Your professional passport photos are now ready! The tool gives you two convenient download options.
- Download Single Photo: This option gives you a single, perfectly cropped and edited digital copy of your passport photo. This is useful for online applications that require a digital photo file. You can download it as a JPG or PNG.
- Download Full Photo Sheet: This is the most common option. It gives you the complete, print-ready sheet with multiple photos arranged on it. Download this file as a JPG or PNG, save it to a USB drive, and take it to a local print shop, or print it directly at home.
Ready to create your perfect photo?
Supported Photo Sizes & Formats
Our tool is built to meet global standards, offering flexibility for any requirement.
- Pre-set Country Standards:
- USA: 2 x 2 inches (51 x 51 mm)
- UK & Schengen Visa: 35 x 45 mm
- India: 35 x 35 mm
- Canada: 35 x 45 mm
- Australia: 35 x 45 mm
- Custom Sizes: If you need a unique size for a specific ID or application, you can select “Custom Size” and enter the exact width and height in millimeters (mm), centimeters (cm), or inches.
- Print Sheet Sizes:
- 4R (6×4 inch): The most common photo paper size.
- A4 & Letter: Standard paper sizes for home printers.
- Download Formats:
- JPG: Best for high-quality photos with small file sizes, ideal for both printing and online submissions.
- PNG: Best for digital use, especially if you need a transparent background (though not typically required for passport photos).
Tips for Best Passport Photo at Home
Taking a photo that will be accepted by official authorities requires paying attention to a few key details. Follow these tips to capture the perfect source image.
- Use a Plain Background: Stand in front of a plain white, off-white, or light grey wall. Avoid patterns, textures, or objects in the background. If you don’t have a suitable wall, hang a plain white sheet.
- Find Good, Even Lighting: The best light is natural daylight. Stand facing a window to get soft, even light on your face. Avoid standing directly under a ceiling light, as it can create harsh shadows under your eyes and nose. Do not use a flash, as it can cause red-eye and glare.
- Maintain a Neutral Expression: Look directly into the camera lens. Keep your expression neutral—a slight, natural smile is sometimes acceptable, but a broad grin is not. Make sure both of your eyes are open and clearly visible.
- Position Yourself Correctly: Have someone else take the photo for you from about 4-5 feet away. This avoids the distortion that can occur with selfies. Your head and shoulders should be in the frame, with some space around them.
- What to Wear: Wear your normal daily attire. Avoid uniforms or clothing that looks like a uniform. It’s also best to avoid wearing white, as it can blend in with a white background.
- Glasses and Headwear: If you wear glasses daily, you can usually keep them on, but make sure there is no glare on the lenses that obstructs your eyes. Headwear is only permitted for religious or medical reasons and must not cover any part of your face.
Why Choose Our Tool Over Others?
There are many options available, but our Passport Photo Maker is designed to be the most user-friendly and effective solution.
- Step-by-Step Guided Process: Unlike other tools that present you with a complicated interface, our maker guides you through a simple 4-step process. You always know what to do next.
- Advanced Editing, Simplified: We offer powerful features like background color changes and advanced filters, but present them in a way that is easy for anyone to use. You don’t need to be a photo editing expert.
- No Watermarks or Hidden Fees: Our tool is completely free. The photos you download are yours to use, with no distracting watermarks or logos.
- Privacy-Focused: The entire process happens in your browser. While the tool provides a link to an external background remover, the core functionality does not require you to upload your sensitive ID photo to a third-party server.
- Instant Print-Ready Sheets: The ability to automatically arrange multiple photos onto a standard print sheet is a huge time-saver and a feature often missing from other free tools.
FAQs (Frequently Asked Questions) About Passport Photo Tool
What is the best way to take a passport photo at home?
The best way to take a passport photo at home is to stand in front of a plain white or off-white wall during the day, facing a window for natural light. Have someone else take the picture from 4-5 feet away. Look directly at the camera with a neutral expression and both eyes open.
Can I use my phone to take a passport photo?
Yes, absolutely. Modern smartphone cameras are high-quality enough for passport photos. Just ensure you follow the guidelines for lighting, background, and expression. Avoid using the front-facing (selfie) camera, as it can cause distortion. Have someone else take the photo with the rear camera.
How do I print a passport photo sheet correctly?
When printing the photo sheet you downloaded from our tool, make sure your printer settings are set to ‘100%’ or ‘Actual Size’. Do not use any ‘Fit to Page’ or ‘Scale to Fit’ options, as this will change the dimensions of the photos. Use high-quality photo paper for the best results.
Is it cheaper to print my own passport photos?
Yes, it is significantly cheaper. Using a free online tool like ours costs nothing to create the photo sheet. You only pay for the cost of printing, which is usually just a few rupees or cents for a single 6×4 photo sheet at a local print shop, compared to the much higher fees charged by professional studios or photo booths.
What background color is required for a US passport photo?
For a US passport photo, you must use a plain white or off-white background. Our tool allows you to easily select a white background to ensure your photo is compliant.
Conclusion
Creating your own passport and ID photos has never been easier. By following the simple steps outlined in this guide and using our powerful, free online Passport Photo Maker, you can avoid the cost, time, and inconvenience of traditional methods. You gain complete control over the process, ensuring you get a high-quality, compliant photo that you’re happy with.
Whether you’re preparing for international travel, applying for a new job, or simply need an updated ID photo, empower yourself with the right tool. Give our Passport Photo Maker a try today and experience just how simple and fast creating official photos can be.


